After setting up the basic layout, menu, axios configuration and API helper class, we will now create the front end user interface pages for Country management. Add a new folder named pages in src folder. We will keep all pages here.
Create empty pages and routes
In src\pages folder, add a new folder, name it country. In country folder, add a new file, name it Countries.tsx. Type rafce and enter the default template code, which will look like below.
const Countries = () => {
  return (
    <div>Countries</div>
  )
}

export default Countries
Create two more pages, CountryEdit.tsx and CountryDelete.tsx, in src\pages\country folder. Type rafce in both pages and insert the template code in both.
Now open src\App.tsx file, here we will add routes for country pages. Update the file so that the routing is set as follows.
<BrowserRouter>
  <Routes>
    <Route path="/" element={<Layout />}>
      <Route index element={<Home />} />
      {/* Country */}
      <Route path="countries">
        <Route index element={<Countries />} />
        <Route path="edit" element={<CountryEdit />} />
        <Route path="edit/:countryId" element={<CountryEdit />} />
        <Route path="delete/:countryId" element={<CountryDelete />} />
      </Route>
    </Route>
  </Routes>
</BrowserRouter>
Run the React project using npm start, the default localhost:3000 should now display the Home.tsx, as we have set it index element of home in routing (App.tsx). Click on Countries link from top menu, it should open the Countries.tsx page, because we have set routing /countries index to this page.
Country list and search page
Now we will update the Countries.tsx and build search countries page. In the beginner React series, we first created the List (get all) page, then added searching and paging to the Person. Here, we do not have get all API, we just have search API, which returns page 1 of countries with default page size. So we will build the countries page by adding search and paging features directly.
For country search, we will explain each step in detail and build the page step by step. You can create search pages for city, state yourself. Start by adding a state variable to store the country list. It is not of type CountryRes[]. It is of type PagedRes. PagedRes consists of generic array of any type T[] and metadata. The below statement will create an array of CountryRes, which will only have countries of single page. Metadata contains the current page, total pages, total rows information, so that we can build paging links (next, previous etc.).
The searching, paging and sorting support cannot be covered in one article, we discussed this in very detail in the beginner series. If you don’t know what’s going on, I would strongly recommend to read the beginner ASP.NET and React series and build a sample app (including searching, paging, sorting) with single table.
const [pagedRes, setPagedRes] = useState<PagedRes<CountryRes>>();
Next we add state variable to store search text.
const [searchText, setSearchText] = useState<string>("");
Then add the 3rd state variable to store the search request dto. It is initialized with default values, which will request for first page with default page size. Whenever we update search or move to next, previous page, we will only update this dto.
const [searchReq, setSearchReq] = useState<CountryReqSearch>(
  new CountryReqSearch({}, {})
);
Now add a new useEffect hook, which will call the search API, whenever there is a change in search dto state variable. We only call search API in useEffect.
useEffect(() => {
  searchCountries();
}, [searchReq]);

const searchCountries = () => {
  CountryApi.search(searchReq).then((res) => {
    setPagedRes(res);
    console.log(res)
  });
};
Save the file and run the project using npm start. Run the ASP.NET web API project as well, so that we can connect the React app with the API. Open the React app in browser, localhost:3000 and click on Countries link. Open Console tab in Chrome or any browser you are using. The app should call search countries API on page load, with default parameters. The console tab should also display the first page of countries returned from the API.

If there is an error, make sure that
- ASP.NET web API project is running
- In React src.env.development file has REACT_APP_API_BASE_URL=https://localhost:7136/api URL set correctly. This should be the URL of the web API. Update it if it is not correct.
- Add console.log(“base url: ” + process.env.REACT_APP_API_BASE_URL) in Countries.tsx and make sure that variable is set correctly. Stop React project. Start again using npm start. See if the environment variable is loaded correctly and API is called.
- Check ConfigureCors method in ASP.NET web API extension method, make sure that http://localhost:3000 is in the list. Also check that policy name is CorsPolicy.
- Check ASP.NET program.cs, make sure that app.UseCors(“CorsPolicy”); is called.
Most common issues in connectivity are related to CORS and loading base URL from environment variables.
Now add two methods for previous and next page navigation as follows. previousPage method reads the state variable of paged response, gets current page, decrement it by 1 and then update the state variable. Similarly nextpage method increments the current page and then update the state variable. Whenever the state variable is updated, search web API will be called automatically, due to useEffect hook.
const previousPage = () => {
  if (pagedRes?.metaData) {
    let previousPageNumber = (pagedRes?.metaData?.currentPage || 2) - 1;
    setSearchReq({
      ...searchReq,
      ...{ pageNumber: previousPageNumber },
    });
  }
};

const nextPage = () => {
  if (pagedRes?.metaData) {
    let nextPageNumber = (pagedRes?.metaData?.currentPage || 0) + 1;
    setSearchReq({ ...searchReq, ...{ pageNumber: nextPageNumber } });
  }
};
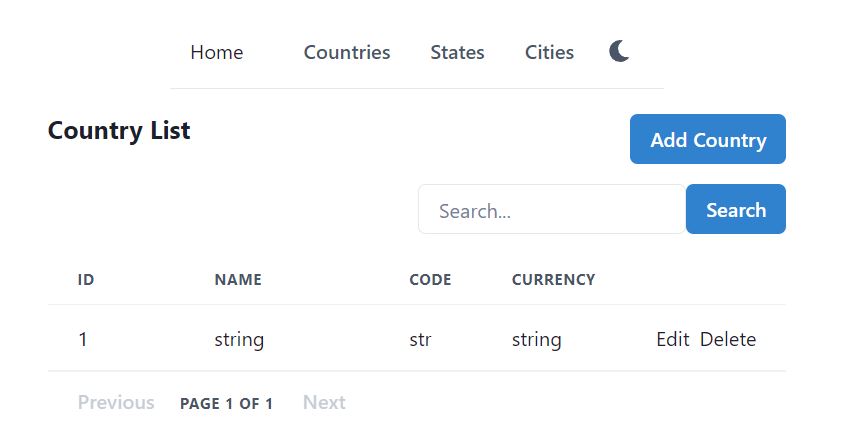
Update the return method and add the code below, to display the header, search bar and person list. showHeading method displays heading and Add Country button. displaySearchBar method displays the search textbox and search button. showCountries method displays the current page of countries with next, previous navigation links. You can get the complete code from GitHub. The code is simple and just renders the country data from the list. If you want detail explanation on this, then read this article from the beginner React series.
return (
  <Box width={"100%"} p={4}>
    <Stack spacing={4} as={Container} maxW={"3xl"}>
      {showHeading()}
      {displaySearchBar()}
      {showCountries()}
    </Stack>
  </Box>
);
Save the code and run the react project with npm start. It should display the countries that exist in the database.

Create and Edit Country page
Previously in the beginner series, we created one page to handle both create and edit operations for Person, we will do the same here for the Country. A single React page will call both create and update web APIs.
Open src\pages\country\CountryEdit.tsx, start by adding the code for handling url parameter countryId. For adding new country, the url will be localhost:3000/countries/edit. For updating, it will be localhost:3000/countries/edit/{countryId}. We already set this route in App.tsx. Now we will handle the countryId url parameter in the Edit page.
const params = useParams();
const countryId = params.countryId;
const updateText = countryId ? "Update Country" : "Add Country";
We also need a state variable to store the value of country dto. Declare the state variable as below and initialize it with default constructor. The default constructor initializes all string values with empty string and numbers with 0. In Formik, this will be used as initial value for creating the new country. In case of edit, we will load data from web API into the country state variable. toast and navigate variables are also declared for toast messages and navigation. Then state variable for error is also declared, to display error messages from web API.
const [country, setCountry] = useState<CountryReqEdit>(new CountryReqEdit());
const toast = useToast();
const navigate = useNavigate();
const [error, setError] = useState("");
After that, we will add the useEffect hook to load the country. We use [countryId] in useEffect, so that whenever the value of countryId is changed, loadCountry method will be called automatically to get fresh data from the web API.
In loadCountry method, we call the API helper method CountryApi.get(). If the API call is successful, we set the country state variable with data. If there is an error, we update error state variable and also display error message in toast.
useEffect(() => {
  loadCountry();
}, [countryId]);

const loadCountry = () => {
  setError("");
  if (countryId) {
    CountryApi.get(countryId)
      .then((res) => {
        setCountry(res);
      })
      .catch((error) => {
        setError(error.response.data.error);
        toast({
          title: "Failed to get Country",
          description: error.response.data.error,
          status: "error",
          position: "bottom-right",
        });
      });
  }
};
After that we will define validation schema for the Formik form, using the Yup library. Country table has many fields, lets start with the 3 required fields, we will add other fields later.
// Formik validation schema
const validationSchema = Yup.object({
  name: Yup.string().required("Country Name is required"),
  iso3: Yup.string().max(3).required("Iso3 code is required"),
  iso2: Yup.string().max(2).required("Iso2 code is required"),
});
After defining the schema, lets move to submitting the form. submitForm method is called from Formik. Its parameter values: CountryReqEdit is also passed by Formik to this method. In submitForm method, we can easily check with countryId variable, if it has value, we will update country. If countryId is undefined, we will create new country.
updateCountry method calls the API helper method update, which sends PUT http requests to the web API. createCountry calls the helper method create, which sends http POST request to the web API. Both methods show success messages if successful. Both methods also handle error and sets the error state variable if there is any exception.
const submitForm = (values: CountryReqEdit) => {
  // console.log(values);
  if (countryId) {
    updateCountry(values);
  } else {
    createCountry(values);
  }
};

const updateCountry = (values: CountryReqEdit) => {
  setError("");
  CountryApi.update(countryId, values).then((res) => {
    toast({
      title: "Success",
      description: "Country updated successfully.",
      status: "success",
      position: "bottom-right",
    });
    navigate("/countries");
  }).catch(error => {
    setError(error.response.data.error);
  });
};

const createCountry = (values: CountryReqEdit) => {
  setError("")
  CountryApi.create(values).then((res) => {
    toast({
      title: "Success",
      description: "Country created successfully.",
      status: "success",
      position: "bottom-right",
    });
    navigate("/countries");
  }).catch(error => {
    setError(error.response.data.error);
  });
};
Now we can go ahead and define the Formik form, as we have complete all the things needed for the form. Formik requres
initialiValues – we use empty CountryReqEdit for create, load it with country data for update
submitForm method – we defined it and handled create/update scenarios
validation schema – It is also defined above Inside the form, we use Stack component, so that all controls are displayed in stack. We will start with three fields, so there will be three FormControl components inside the Stack. The FormControl for country name has three components
FormLabel – display label, user friendly string, Country Name
Field – for input data, it can be textbox, checkbox, list, radio etc., here we have Input
FormErrorMessage – displays validation message according to the validation schema
We will create FormControl for Iso3 and Iso2 as well, using the same pattern.
const showUpdateForm = () => (
  <Box p={0}>
    <Formik
      initialValues={country}
      onSubmit={(values) => {
        submitForm(values);
      }}
      validationSchema={validationSchema}
      enableReinitialize={true}
    >
      {({ handleSubmit, errors, touched, setFieldValue }) => (
        <form onSubmit={handleSubmit}>
          <Stack spacing={4} as={Container} maxW={"3xl"}>
            <FormControl isInvalid={!!errors.name && touched.name}>
              <FormLabel htmlFor="name">Country Name</FormLabel>
              <Field as={Input} id="name" name="name" type="text" />
              <FormErrorMessage>{errors.name}</FormErrorMessage>
            </FormControl>
            <FormControl isInvalid={!!errors.iso3 && touched.iso3}>
              <FormLabel htmlFor="iso3">Iso3 code</FormLabel>
              <Field as={Input} id="iso3" name="iso3" type="text" />
              <FormErrorMessage>{errors.iso3}</FormErrorMessage>
            </FormControl>
            <FormControl isInvalid={!!errors.iso2 && touched.iso2}>
              <FormLabel htmlFor="iso2">Iso2 code</FormLabel>
              <Field as={Input} id="iso2" name="iso2" type="text" />
              <FormErrorMessage>{errors.iso2}</FormErrorMessage>
            </FormControl>
            <Stack direction={"row"} spacing={6}>
              <Button type="submit" colorScheme={"blue"}>
                {updateText}
              </Button>
            </Stack>
          </Stack>
        </form>
      )}
    </Formik>
  </Box>
);
Finally, update the return method as follows, to define the page layout. The layout consists of heading, error message and update form. You can get the complete code on GitHub, where we have added all the fields for Country.
return (
  <Box width={"lg"} p={4}>
    <Stack spacing={4} as={Container} maxW={"3xl"}>
      {displayHeading()}
      {error && <AlertBox description={error} />}
      {showUpdateForm()}
    </Stack>
  </Box>
);
Delete Country page
Lets create the React page for Deleting the Country. In App.tsx we already set the routing for url localhost:3000/countries/delete/{countryId}. So we need to get the countryId from url parameter. We will also declare a state variable to store country data. navigate and toast are also required for navigation and toast messages. error state variable is also required to store the error messages. Create a new file in src\pages folder, name it as CountryDelete.tsx.
let params = useParams();
const countryId = params.countryId;
const [country, setCountry] = useState<CountryRes>();
const navigate = useNavigate();
const toast = useToast();
const [error, setError] = useState("");
The delete page will display some information about the country on page load. We will create useEffect hook to load the data from the web API. We used [countryId] in useEffect, so that whenever the countryId value changes, the loadCountry method will automatically be called.
In loadCountry method, we call API helper method to get the country, which sends http GET request to the web API. If call is successful, it sets the country state variable with country data. In case of exception, it sets the error message in the state variable.
useEffect(() => {
  loadCountry();
}, [countryId]);

const loadCountry = () => {
  setError("")
  if (countryId) {
    CountryApi.get(countryId)
      .then((res) => {
        setCountry(res);
        console.log(res);
      })
      .catch((error) => {
        setError(error.response.data.error);
        console.log("Error in api: " + error);
      });
  }
};
Now write the deleteCountry method to call the web API for deleting the country. The delete helper method sends the http DELETE request to the web API. If the API call is successful, it shows toast notification and navigates to the countries page. In case of exception in delete API, it sets the error message in the state variable and displays toast notification.
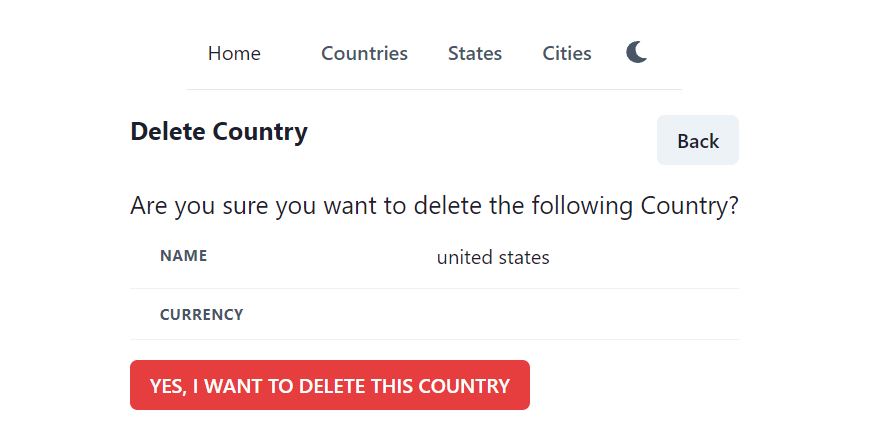
Then update the return method to render the layout of the delete page. It displays heading, error message and country information. We also display alert dialog to ask for confirmation before deleting the country. It will delete the country only after confirmation. We will not explain the alert dialog code here, you can read about the alert dialog in detail in this article. Complete code of CountryDelete.tsx is available on GitHub.
return (
  <Box p={4}>
    <Stack spacing={4} as={Container} maxW={"3xl"}>
      {displayHeading()}
      {error && <AlertBox description={error} />}
      {showCountryInfo()}
      {showAlertDialog()}
    </Stack>
  </Box>
);
Save the file and run the project using npm start. Now add a new country and try to delete a record, it should show the below interface.

Delete Country that has States
Country and state has one to many relationship. A Country can have multiple states. State table has Country Id foreign key. Below is the entity diagram generated from SQL Server.

What should happen if we delete a country? There are multiple options.
- Just delete country. Do not delete its states. This way all its states will become orphans. For example if USA has New York and Florida states, and we delete USA country, the states will be left without any parent. This is not suitable in this case.
- Delete country and its states. This is too risky and may result in too much data loss. For example USA has 2 states. There are total 30 cities in these states. This method would delete the whole tree, all its children. This method might be useful in some cases, but not at least in deleting country.
- Do not let user delete country. Warn the user, that it has states, which might result in huge data loss. So in this case, we will follow this method.
Prevent user from deleting Country, which has States
We need a new state variable stateCount to get the total number of states in the country. We also need to call API to get the state count. We were already loading country details in useState. We just need to call another method loadStateCount in the same useState hook. In loadStateCount, call the API helper method to get the count.
const [stateCount, setStateCount] = useState<number>(0);

useEffect(() => {
  loadCountry();
  loadStateCount();
}, [countryId]);

const loadStateCount = () => {
  StateApi.countByCountryId(countryId).then(res => {
    setStateCount(res);
  })
}
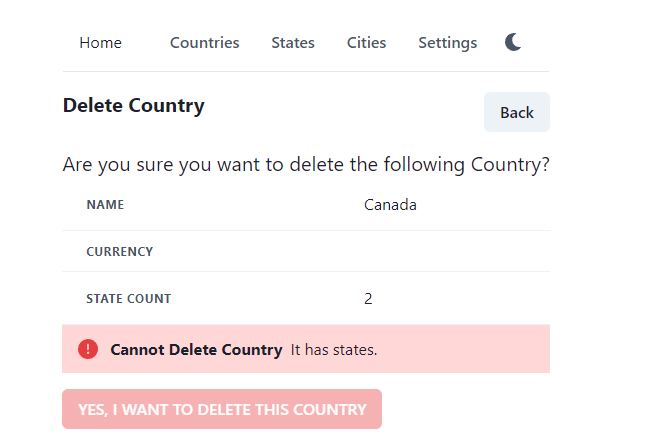
We will also show the state count to the user in the showCountryInfo method, which displays Country data in table. And just before the big red “YES, I WANT TO DELETE THIS COUNTRY” button, we will also display error alert, to warn the user about deleting country. And if the country has 1 or more states, we will also disable the Delete button, so that user cannot click it.
Note that, even if we do not disable the button and call the Delete API, our web API will not delete the Country. Because EF Core does not let you delete the parent, if it has child records.
{(stateCount > 0) && <AlertBox title="Cannot Delete Country" description={"It has states."} />}

<Button onClick={onOpen} type="button" colorScheme={"red"}
  disabled={stateCount > 0}>
    YES, I WANT TO DELETE THIS COUNTRY
</Button>
Now save the project and run it with npm start. Try to delete a country, which has some states, it will disable the delete button and show the error alert message as follows.

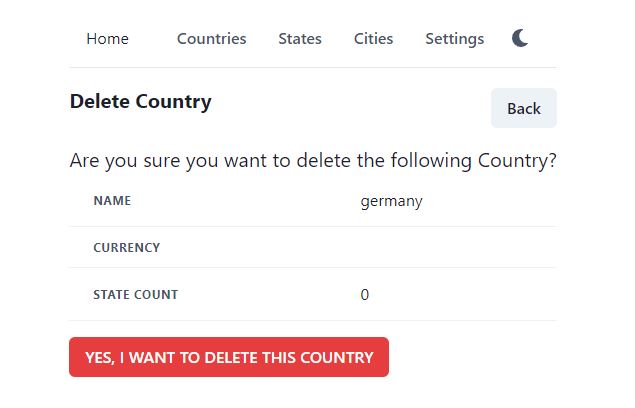
Then try to delete a Country, which has no state. It will now let you click on Delete button. No error message will be displayed.

You can get the complete code from the GitHub repository. To view the files directly, use the links below.