After creating the layout for Settings, now we can create the pages for managing labels. We have six types of labels, so we will create CRUD pages for all the label types.
All labels are same, having Id and label fields. In this article, we will create the CRUD pages for phone label. You may create pages for other labels following the same pattern.
Search Phone Label
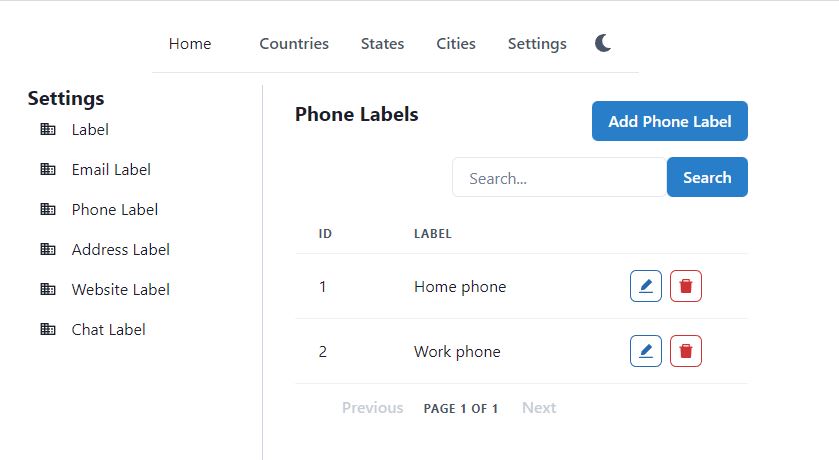
Lets start with the search page. Create a new file PhoneLabels.tsx in src\settings\phone-labels folder. Type rafce and enter the default code. In the end the search page will look like below.

First we will create some state variables.
- searchParams – keep the url search params
- pagedRes – store the paged response of phone labels, data returned from the web API
- searchText – text that user types in the search box
const location = useLocation();
const [searchParams, setSearchParams] = useSearchParams(location.search);
searchParams.set("pageSize", Common.DEFAULT_PAGE_SIZE.toString());

const [pagedRes, setPagedRes] = useState<PagedRes<PhoneLabelRes>>();
const [searchText, setSearchText] = useState<string>("");
Then we will create a useEffect hook, that will get the labels from the web API. The useEffect hook will be fired whenever searchParams are updated. The useEffect hook calls searchPhoneLabels method, which calls the API helper method and pass the search params. We convert search params from string format to Object format.
For example if the Url is localhost:3000/settings/phone-labels?pageSize=5&pageNumber=2&searchText=h, the string after the “?” is the search params, which we can get in React using useSearchParams(location.search)
But our API helper method takes object of type PhoneLabelReqSearch in parameters. So we convert url search params from string to object using the Object.fromEntries(string) method.
useEffect(() => {
  searchPhoneLabels();
}, [searchParams]);

const searchPhoneLabels = () => {
  if (!searchParams) return;
  PhoneLabelApi.search(Object.fromEntries(searchParams)).then((res) => {
    setPagedRes(res);
  });
};
After that we will create a generic method to update the search params in the Url. The method updateSearchParams will update the url search params in the Url, with the specified key and value. And when the search params are updated, our useEffect hook will get the fresh data from the web API.
const updateSearchParams = (key: string, value: string) => {
  searchParams.set(key, value);
  setSearchParams(searchParams);
};
Now we will create the previous and next page navigation methods. The previousPage method gets the currentPage value from pagedRes (returned from the web API). It decrements the current page and updates the url search params. Url search params are bound to the useEffect, which will reload the data from the web API. The nextPage method works in similar way, it increments the currentPage and updates the url search params.
const previousPage = () => {
  if (pagedRes?.metaData) {
    let previousPageNumber = (pagedRes?.metaData?.currentPage || 2) - 1;
    updateSearchParams("pageNumber", previousPageNumber.toString());
  }
};

const nextPage = () => {
  if (pagedRes?.metaData) {
    let nextPageNumber = (pagedRes?.metaData?.currentPage || 0) + 1;
    updateSearchParams("pageNumber", nextPageNumber.toString());
  }
};
The main return method contains three parts.
- showHeading – it just displays the heading and a link button to create a new label
- displaySearchBar – Search text box, when user types in some text and press enter, it will update the url search params, so that new data is loaded from the web API
- showPhoneLabels – It displays the phone labels in table format. It only displays the data from pagedRes state variable.
return (
  <Box width={"100%"} p={4}>
    <Stack spacing={4} as={Container} maxW={"3xl"}>
      {showHeading()}
      {displaySearchBar()}
      {showPhoneLabels()}
    </Stack>
  </Box>
);
You can get the complete code from GitHub.
Create or Edit Phone Label
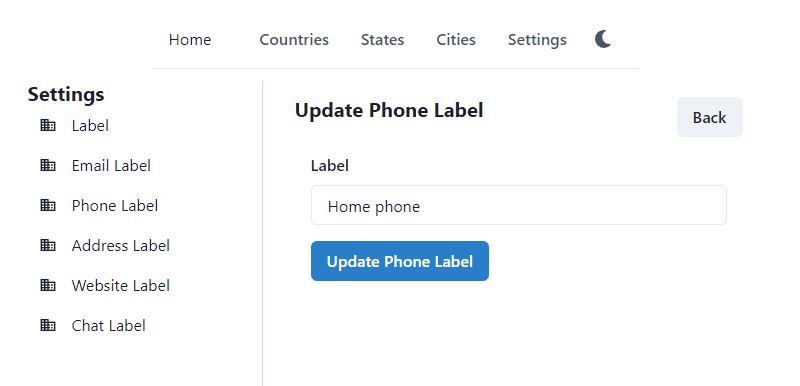
Create a new file PhoneLabelEdit.tsx in src\settings\phone-labels folder. Type rafce and enter the default template code. The page will look like below

First we get the phoneLabelId from url params. If id is present in the url, then it means we are editing, otherwise we are creating a new label. Below is the Url format.
- http://localhost:3000/settings/phone-labels/edit – create a new label
- http://localhost:3000/settings/phone-labels/edit/1 – edit an existing label with id 1
const params = useParams();
const phoneLabelId = params.phoneLabelId;
const updateText = phoneLabelId ? "Update Phone Label" : "Add Phone Label";
Then we load the phone label from the web API, with the useEffect hook, whenever the label id value is updated.
const [phoneLabel, setPhoneLabel] = useState<PhoneLabelReqEdit>(new PhoneLabelReqEdit());

useEffect(() => {
  loadPhoneLabel();
}, [phoneLabelId]);

const loadPhoneLabel = () => {
  setError("");
  if (phoneLabelId) {
    PhoneLabelApi.get(phoneLabelId)
      .then((res) => {
        setPhoneLabel(res);
      })
      .catch((error) => {
        setError(error.response.data.error);
      });
  }
};
After that we initialize the validation schema for the formik form. There is only one field “label”, which we need to create or update.
const validationSchema = Yup.object({
  label: Yup.string().required("Label is required").max(20),
});
Then we will define the submitForm method, which will call createPhoneLabel if the label id is not present in the url. If we have label id in the url, it will call the update phone label method.
const submitForm = (values: PhoneLabelReqEdit) => {
  if (phoneLabelId) {
    updatePhoneLabel(values);
  } else {
    createPhoneLabel(values);
  }
};

const updatePhoneLabel = (values: PhoneLabelReqEdit) => {
  setError("");
  PhoneLabelApi.update(phoneLabelId, values)
    .then((res) => {
      navigate("/settings/phone-labels");
    })
    .catch((error) => {
      setError(error.response.data.error);
    });
};

const createPhoneLabel = (values: PhoneLabelReqEdit) => {
  setError("");
  PhoneLabelApi.create(values)
    .then((res) => {
      navigate("/settings/phone-labels");
    })
    .catch((error) => {
      setError(error.response.data.error);
    });
};
Then we will define the form with Formik component. We will set the initialValues with the phoneLabel state variable. onSubmit is also set to submitForm method, which we already defined. We also defined validationSchema previously, which will be used here.
Inside the form, we will have separate FormControl components for each field. We have only one field, so there is only one FormControl component for the label field. At the end, we add a Submit button.
const showUpdateForm = () => (
  <Box p={0}>
    <Formik
      initialValues={phoneLabel}
      onSubmit={(values) => {
        submitForm(values);
      }}
      validationSchema={validationSchema}
      enableReinitialize={true}
    >
      {({ handleSubmit, errors, touched, setFieldValue }) => (
        <form onSubmit={handleSubmit}>
          <Stack spacing={4} as={Container} maxW={"3xl"}>
            <FormControl isInvalid={!!errors.label && touched.label}>
              <FormLabel htmlFor="label">Label</FormLabel>
              <Field as={Input} id="label" name="label" type="text" />
              <FormErrorMessage>{errors.label}</FormErrorMessage>
            </FormControl>
            <Stack direction={"row"} spacing={6}>
              <Button type="submit" colorScheme={"blue"}>
                {updateText}
              </Button>
            </Stack>
          </Stack>
        </form>
      )}
    </Formik>
  </Box>
);
The main return method finally calls the methods to set the layout within the page.
- displayHeading – shows the heading for create or update
- error – displays the error message from the web API, if present
- showUpdateForm – displays the Formik form
return (
  <Box width={"lg"} p={4}>
    <Stack spacing={4} as={Container} maxW={"3xl"}>
      {displayHeading()}
      {error && <AlertBox description={error} />}
      {showUpdateForm()}
    </Stack>
  </Box>
);
Delete Phone Label
To delete a phone label, we need the label Id in the url param. An example of the Url would be http://localhost:3000/settings/phone-labels/delete/1.
Create a new file PhoneLabelDelete.tsx in src\settings\phone-labels folder. Type rafce and enter the default template code.
We will start by creating state variables.
- phoneLabelId – Get from the url params
- phoneLabel – stores the phone label, object of type PhoneLabelRes
- anyPhone – boolean variable, true if this label is used in a phone number
let params = useParams();
const phoneLabelId = params.phoneLabelId;
const [phoneLabel, setPhoneLabel] = useState<PhoneLabelRes>();
const [anyPhone, setAnyPhone] = useState<boolean>(false);
We load the phone label in the useEffect hook, which is fired when phoneLabelId is updated. It loads the phone label from the web API. It also call the web API to check whether this phone is used in phone number or not.
useEffect(() => {
  loadPhoneLabel();
  checkAnyPhone();
}, [phoneLabelId]);

const loadPhoneLabel = () => {
  setError("")
  if (phoneLabelId) {
    PhoneLabelApi.get(phoneLabelId)
      .then((res) => {
        setPhoneLabel(res);
      })
      .catch((error) => {
        setError(error.response.data.error);
      });
  }
};

const checkAnyPhone = () => {
  ContactPhoneApi.anyPhone(phoneLabelId).then(res => {
    setAnyPhone(res)
  })
}
Then we will write a method to delete the phone number. It calls the API helper method to delete the phone label. This method will be called by pressing the Confirm Delete button in the Chakra UI confirmation dialog box.
const deletePhoneLabel = () => {
  setError("")
  PhoneLabelApi.delete(phoneLabelId).then(res => {
    navigate("/settings/phone-labels");
  }).catch(error => {
    setError(error.response.data.error);
  })
}
The main return method renders the page components as follows
- displayHeading – displays the heading and back button
- error – displays the error, if any, in an alert box
- showPhoneLabel – displays the phone label to the user, so that the user knows what he is going to delete
- showAlertDialog – shows the confirmation dialog, if user confirms in this dialog, only then the delete method will be called.
return (
  <Box p={4}>
    <Stack spacing={4} as={Container} maxW={"3xl"}>
      {displayHeading()}
      {error && <AlertBox description={error} />}
      {showPhoneLabel()}
      {showAlertDialog()}
    </Stack>
  </Box>
);
We will not discuss the code for displayHeading, error and showAlertDialog methods, as these are already discussed in previous articles.
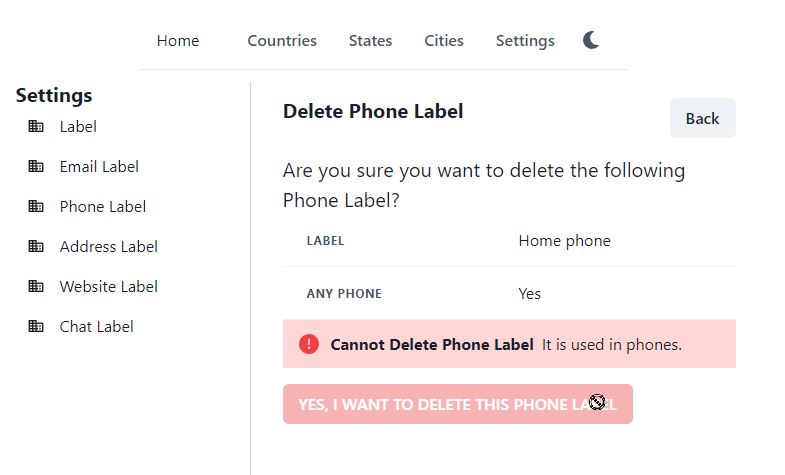
But we will present the code for showPhoneLabel. It shows the phone label information to the user. It also shows Yes/No in Any Phone, so that user should know that this label is being used in phone numbers and cannot be deleted. If this phone is used, it will print “Yes”. In case of Yes, it will also show an error alert box with title and description, telling the user that this phone label is being used in phone numbers. The state variable anyPhone is also used to disable the Delete button on the page.

const showPhoneLabel = () => (
  <div>
    <Text fontSize="xl">
      Are you sure you want to delete the following Phone Label?
    </Text>
    <TableContainer>
      <Table variant="simple">
        <Tbody>
          <Tr>
            <Th>Label</Th>
            <Td>
              {phoneLabel?.label}
            </Td>
          </Tr>
          <Tr>
            <Th>Any Phone</Th>
            <Td>{anyPhone ? "Yes" : "No"}</Td>
          </Tr>
        </Tbody>
      </Table>
    </TableContainer>
    {(anyPhone) && <AlertBox title="Cannot Delete Phone Label" description={"It is used in phones."} />}
    <HStack pt={4} spacing={4}>
      <Button onClick={onOpen} type="button" colorScheme={"red"} disabled={anyPhone}>
        YES, I WANT TO DELETE THIS PHONE LABEL
      </Button>
    </HStack>
  </div>
  );
You can create the CRUD pages for the remaining 5 labels in the same pattern. Full source code can be viewed and downloaded from GitHub.