This is the second article of the introduction to EF Core series. In the previous article we
- Created a new ASP.NET Core Web API project
- Added an entity class Person
- Added AppDbContext class to use Entity Framework
In this article we will initialize the database context class and generate the database tables.
Initialize database context
There is a file Program.cs in every ASP.NET Core Web API project. This file is loaded when the project starts execution. We will initialize the database context here.
The program.cs already has some initialization code. We will create service extension methods and write our code in external classes, to keep Program.cs file less messy.
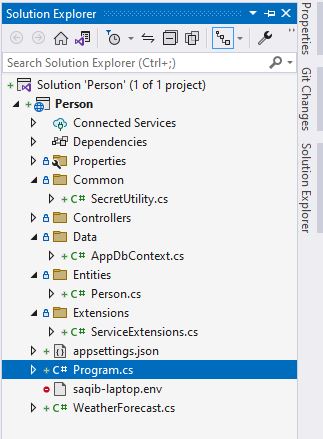
Create a new folder in project, name it Extensions. In this folder create a new class ServiceExtensions. This will be a static class. Add the following extension method in this class to configure the database context.
public static class ServiceExtensions
{
  public static void ConfigureSqlContext(this IServiceCollection services)
  {
    services.AddDbContext<AppDbContext>(x => x.UseSqlServer(
        SecretUtility.SqlServer));
  }
}
In this method, we are adding a Db context in the web app and passing it options. AddDbContext is a builtin method, which requires context class. In options, we tell it to use Sql Server and pass connection string.
You will get error on SecretUtility.SqlServer. There are two ways to move forward from here.
- Replace SecretUtility with actual connection string of SQL Server. This is good for development on local, but not recommended for production. The connection string must be kept secure in production environments.
- Create a new folder Common. Create a new class SecretUtility in Common folder. Add a new static property SqlServer. This property will load the connection string from the system’s environment variable named SQLSERVER.
public class SecretUtility
{
  public static string? SqlServer
  {
    get
    {
      return Environment.GetEnvironmentVariable("SQLSERVER");
    }
  }
}
If you want to complete this series, use the second method, because later we will deploy this project using Docker. The Docker compose file will contain the environment variable SQLSERVER. This way, the same code will work on both local and production environments. No need to change code base.
In local system, when you run/debug project, it will read your local PC’s environment variable. Wait… what??? so do we need to go to system settings, modify environment variables…. That would be too much. What if we store other confidential things like Amazon S3 keys, Google keys, and other 3rd party API keys. Imagine we have several projects, so our list of environment variables will increase. No way to tell which variable belongs to which project, it will be a bigger mess.
DotNetEnv to store Confidential Information like connection strings and secret API keys
So we use another NuGet package DotNetEnv. It solves our problem elegantly. We don’t have to edit system variables. We keep all confidential information in a .env file. Install this package in your project using NuGet.

Now create a new file in project root create a new file {your-name}.env. It could be your name, your PC name or any name. This file will contain all confidential information. I have named my file as saqib-laptop.env. It has following text.
SQLSERVER=server=.\sqlexpress;database=Person;Trusted_Connection=true;MultipleActiveResultSets=true;TrustServerCertificate=True;
Add a new extension method in ServiceExtensions class to load the .env file.
public static void ConfigureEnvironmentVariables(this IServiceCollection services)
{
  DotNetEnv.Env.Load("saqib-laptop.env");
}
Call this method in Program.cs, so that the variables are loaded when the program runs.
// Add services to the container.
builder.Services.ConfigureEnvironmentVariables();
Add a .gitignore file in git repository root and add the following line at the end.
# Environment variable files
*.env
The environment file will not be committed to git. It is personal for each team member. Any member can use any name. The same code will work in all the below cases.
- Production With Docker: Confidential information will be loaded from docker compose files
- Local system: Confidential information will be loaded from the .env file.
- The same System.GetEnvironmentVariable(“SQLSERVER”) will work with both system variables and .env files.

Note that red symbol with .env file, that means this file is not uploaded on GitHub or any other repository.
We just created a single line env file containing connection string, which is loaded by SecretUtility class, which is used in Service extension method, which is used finally in Program.cs file.
That seems a lot of work, just to keep the connection string safe. And just to keep the source code consistent for local and debug and test environments. A lot of work, but worth the effort.
Imaging having to modify code every time for local debugging, then testing on staging, then on production system. It will be a lot messier without this effort.
So should we generate the tables now? Not yet…
Open Program.cs file, call our extension method here. So it becomes as below.
// Add services to the container.
builder.Services.ConfigureEnvironmentVariables();
builder.Services.ConfigureSqlContext();
Build the project, it should build without any error. If there is any error, read the article and code snippet again, you might have missed something.
Migrate database
Finally we are ready to create our database in SQL Server.
In Visual Studio, open Package Manager Console. If tab not already open, it is in View -> Other Windows -> Package Manager Console
Add the following command
add-migration initial
add-migration is Entity Framework command
If everything is fine, you will see the following messages after running the above command.
Build started...
Build succeeded.
To undo this action, use Remove-Migration.
A file like 123455_initial.cs will be created and opened automatically. It will contain 2 methods. Up method will save the pending changes to the database. Down method will revert back the changes.
To continue, issue the following command in Package manager console window.
update-database
It will build the project and Entity Framework will try to save the changes to the database. In this initial migration, it will create a new database named Person. That is the name we used in connection string in the .env file.
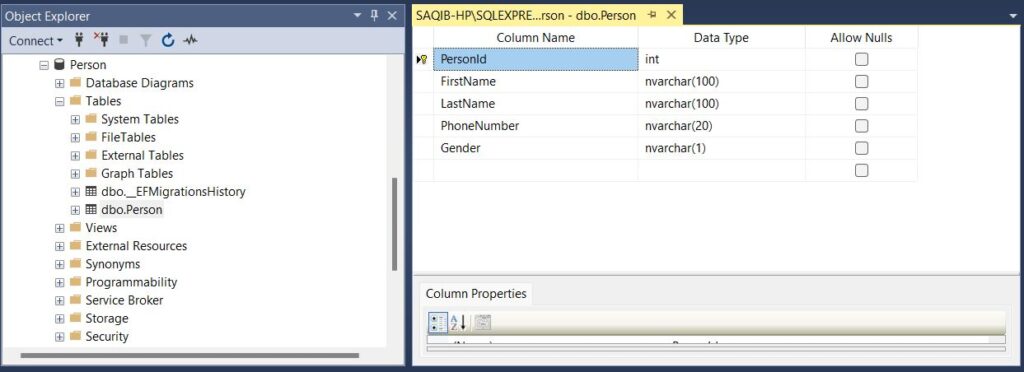
It will also execute the create table scripts to create Person table, which is the name we used in [Table(“Person”)] annotation in Person.cs entity class.
At this time, you can also verify by connecting to the database using SQL Server Management Studio, that the database and table is created.

Congratulations!! if you can also see the new database and table created in SQL Server.
In the next article, we will create the repository classes which will support CRUD operations on the database, using the Entity Framework.