This is the 7th article in the React client app beginner series. In the previous articles, we setup a new React app, created DTOs, configured Axios, built API helper classes and created pages for list all, create and update person. We also used Formik for very simple form and Yup for validation.
In this article, we will create Delete person component in React, that will call web API DELETE http request. The delete feature is very simple to implement, we just need the person Id. We pass this id to web API and call Delete method. But, we will add some more features in the delete page, which are necessary for good user experience.
- Confirmation dialog box using Chakra UI
- Toast notification message after deleting person
- Receive and display error message from web API
API Helper method for Delete using Axios
For delete, we will start by adding a new API helper method in personApi.js. Open src\api\personApi.js and add the delete method as follows.
delete: async function (personId) {
  const response = await api.request({
    url: `/persons/` + personId,
    method: "DELETE",
  })

  return response.data
},
The delete method takes person Id as parameter and sends http DELETE request to the web API using Axios. It sends the API response back to the caller (page).
We do not need any DTO for delete, as we only need the person Id, which is passed as parameter in URL e.g. https://localhost:7277/api/Persons/1.
Delete person page
Add a new file PersonDelete.tsx in /src/persons folder. Type rafce and insert the default template code.
Route for Delete person
In the React app, the url for delete person will be http://localhost:3000/persons/delete/1. We have registered our routes in App.tsx. Open src\App.tsx and add new route for delete. See the below code snippet for reference.
<BrowserRouter>
  <Routes>
    <Route path="/" element={<Layout />}>
      <Route index element={<Home />} />
      {/* Persons */}
      <Route path="persons">
        <Route index element={<Persons />} />
        <Route path="edit" element={<PersonEdit />} />
        <Route path="edit/:personId" element={<PersonEdit />} />
        <Route path="delete/:personId" element={<PersonDelete />} />
      </Route>
    </Route>
  </Routes>
</BrowserRouter>
Load person
Open PersonDelete.tsx again. We will get the personId from the Url with the help of useParams hook as below.
let params = useParams();
const personId = params.personId;
In delete page, we will also show the user information like first name, last name and phone. The user should know the details before deleting the record. To load the user, we will add useEffect hook, just like we did in the PersonEdit.tsx page. Add the state variable and useEffect hook as follows.
const [person, setPerson] = useState<PersonRes>();

useEffect(() => {
  loadPerson();
}, [personId]);

const loadPerson = () => {
  if (personId) {
    PersonApi.get(personId).then(res => {
      setPerson(res);
      console.log(res);
    })
  }
}
Run the project using npm start, if not already running. Open person list and click on the Delete link. Open browser console window. The Json response of Person should be displayed on the delete page, if person id is correct. Or if something is wrong, it should display error.

Page layout
Lets define the page layout in return statement of PersonDelete function. Update the the return statement as follows
return (
  <Box p={4}>
    <Stack spacing={4} as={Container} maxW={"3xl"}>
      {displayHeading()}
      {showPersonInfo()}
    </Stack>
  </Box>
);
The layout is simple, it is divided in two parts, Heading and Person information. The heading part displays text heading and back button. In back button, we have used react-router-dom 6’s useNavigate() hook to go to previous page from browser history. It is fast and very convenient to copy paste the back button everywhere.
const displayHeading = () => (
  <Flex>
    <Box>
      <Heading fontSize={"xl"}>Delete Person</Heading>
    </Box>
    <Spacer />
    <Box>
      <Button type="button" colorScheme={"gray"} onClick={() => navigate(-1)}>
        Back
      </Button>
    </Box>
  </Flex>
);
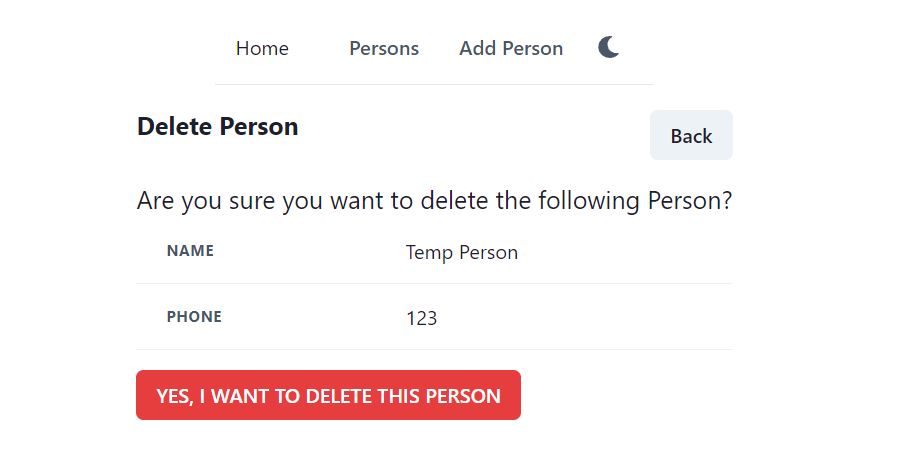
The showPerson method displays person information, his name and phone number. We must show the person details, so that user may review before deleting. The person information is displayed in table. Name in the first row and phone in the second row.
const showPersonInfo = () => (
  <div>
    <Text fontSize="xl">
      Are you sure you want to delete the following Person?
    </Text>
    <TableContainer>
      <Table variant="simple">
        <Tbody>
          <Tr>
            <Th>Name</Th>
            <Td>
              {person?.firstName} {person?.lastName}
            </Td>
          </Tr>
          <Tr>
            <Th>Phone</Th>
            <Td>{person?.phoneNumber}</Td>
          </Tr>
        </Tbody>
      </Table>
    </TableContainer>
    <HStack pt={4} spacing={4}>
      <Button onClick={onOpen} type="button" colorScheme={"red"}>
        YES, I WANT TO DELETE THIS PERSON
      </Button>
    </HStack>
  </div>
);
Note the red button which says “YES, I WANT TO DELETE THIS PERSON”, onclick={onOpen} is set here. This is for opening the dialog box. The code won’t work now, because you will get error that onOpen is not defined.
Dialog box to confirm delete
Delete function is further protected with a dialog box, asking the user again with Yes/No options. It is common and good practice to confirm user before deleting something.
We will use the AlertDialog component from Chakra UI. Lets get started on writing its code. We will use React’s useDisclosure hook for dialog box open and close functions. We will also need the button control reference which will cancel the dialog box.
const { isOpen, onOpen, onClose } = useDisclosure();
const cancelRef = React.useRef<HTMLAnchorElement>(null);
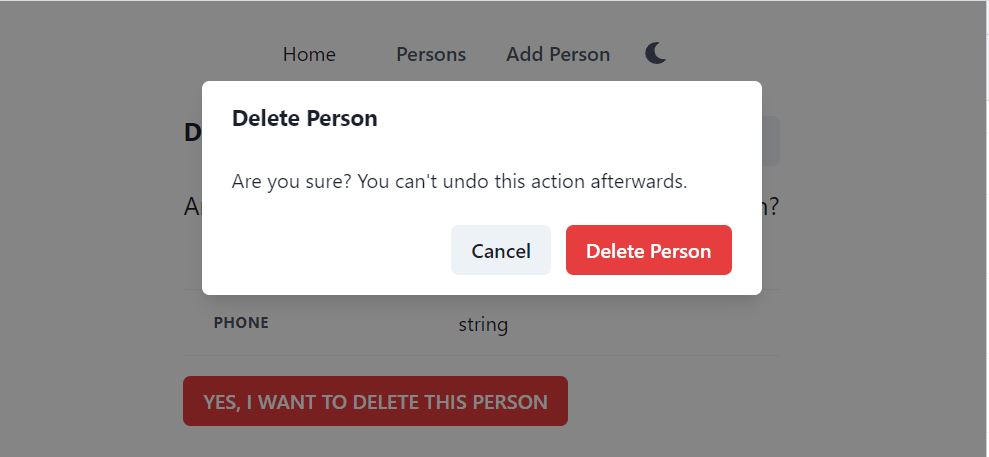
Now lets define the AlertDialog in function as below. The dialog displays warning messages to user in dialog header and body. There are two buttons in the dialog footer. Delete Person button in red calls deletePerson method, we will define it shortly. The Cancel button will close the dialog box. AlertDialog component has properties isOpen, which use toggle from useDisclosure hook. onClose property is also set to onClose from useDisclosure.
const showAlertDialog = () => (
  <AlertDialog
    isOpen={isOpen}
    leastDestructiveRef={cancelRef}
    onClose={onClose}
  >
    <AlertDialogOverlay>
      <AlertDialogContent>
        <AlertDialogHeader fontSize="lg" fontWeight="bold">
          Delete Person
        </AlertDialogHeader>

        <AlertDialogBody>
          Are you sure? You can't undo this action afterwards.
        </AlertDialogBody>

        <AlertDialogFooter>
          <Link ref={cancelRef} onClick={onClose}>
            <Button type="button" colorScheme={"gray"}>Cancel</Button>
          </Link>
          <Link onClick={deletePerson} ml={3}>
            <Button type="submit" colorScheme={"red"}>Delete Person</Button>
          </Link>
        </AlertDialogFooter>
      </AlertDialogContent>
    </AlertDialogOverlay>
  </AlertDialog>
);
deletePerson method
The code we have written so far will give error due to deletePerson method not defined. Lets add this method now as follows.
const deletePerson = () => {
  PersonApi.delete(personId).then(res => {
    navigate("/persons");
  })
}
It calls the delete API helper method. Upon successful completion it navigates to the person list page. The delete method in our web API does not return anything. Check again in Visual Studio, open web API project and open PersonController, the Delete method has the following return statement.
return NoContent();
NoContent() method in ASP.NET Core returns 204 http code. 200 http code means Ok, but 200 generally returns content in response body. 204 also means Ok, but with no content in http response body.
The code should compile correctly now. See the update in React app.

Click on the red Delete button. Nothing happens!! We have missed something. Open PersonDelete.tsx and see the method showAlertDialog. In Visual Studio Code, it is in light grey color, means this method is not called anywhere.
We will call it in the return statement. What will happen if we call it?
Will it display by default? The answer is No. By default, the isOpen property is false, the AlertDIalog will be in closed state.
The AlertDialog has open/close state. The dialog is always there, but it is not open. We click on some button and call isOpen to show it. When we want to close, we call onClose. This behavior comes from React useDisclosure hook, which has common methods for open, close and toggle states.
To make the dialog work, call showAlertDialog in the return statement as follows.
return (
  <Box p={4}>
    <Stack spacing={4} as={Container} maxW={"3xl"}>
      {displayHeading()}
      {showPersonInfo()}
      {showAlertDialog()}
    </Stack>
  </Box>
);
Now click on the red Delete button, it will show the dialog box. Click on Cancel, the dialog box will close. Click on any open space other than the dialog box, it will close. This way of closing is very user friendly and Chakra UI implemented the AlertDialog in an excellent way.

We are still missing something. The delete workflow does not seem natural. You click on delete button, it opens confirmation dialog. You confirm to delete person. It goes back to the person list. It actually deletes the person from the database. But the problem is that it does it silently. It should display acknowledgment whether the person is actually deleted or not.
It should either show
- success notification, that the person is deleted.
- or failure notification, that the person could NOT be deleted.
The user must get acknowledgement.
Toast notifications using Chakra UI
We are using Chakra UI for implementing the visual user interface in the React app. The reason is that it has a very good collection of layout, dialog, toast and many other useful components.
Lets add toast notifications in the delete method. Adding toast notifications is very easy. We will first declare a const variable to get the useToast() hook of Chakra UI. Then we call toast method wherever required.
const toast = useToast();
We will use the toast in delete method as follows.
const deletePerson = () => {
  PersonApi.delete(personId).then(res => {
    toast({
      title: "Success",
      description: person?.firstName + " " + person?.lastName + " deleted successfully.",
      status: "success",
      position: "bottom-right",
    });
    navigate("/persons");
  }).catch(error => {
    toast({
      title: "Error deleting Person",
      description: error,
      status: "error",
      position: "bottom-right",
    });
  })
}
We just called the toast method two times
- In then(), means the delete web API deleted the person, we show toast notification, then to to person list page
- In catch(), this means that the delete web API returned error, we show error message in toast notification
Now delete a person and see the notifications.

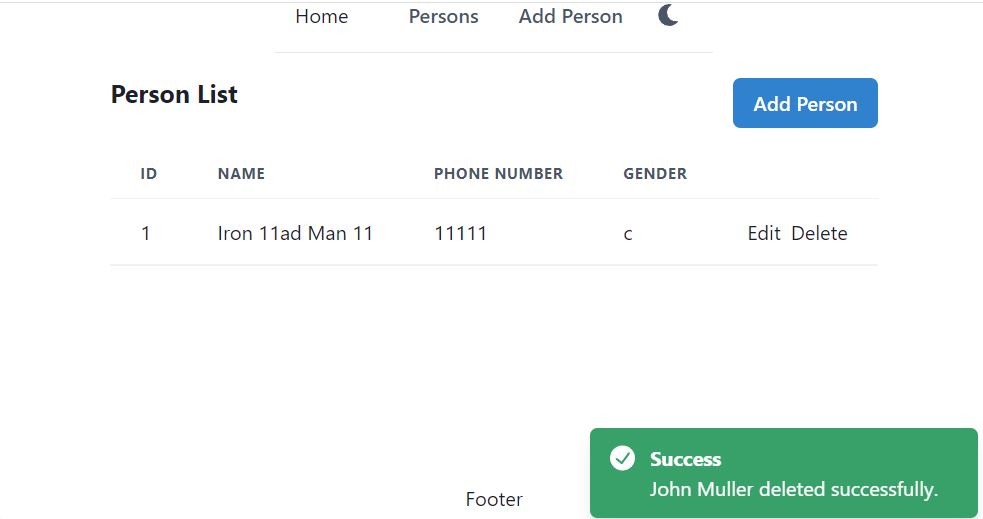
After deleting the person, it goes back to the list person page, but now a notification will be displayed to user, that the person is deleted successfully. You can check the complete code from https://github.com/saqibrazzaq/efcorebeginner/blob/main/Person/react-client/src/persons/PersonDelete.tsx.
In the next article, we will implement searching, sorting and paging.