This is the last and concluding tutorial in both ASP.NET Core and React beginner series. We created API in ASP.NET Core and UI in React to manage Person table with just 4 fields. The app is very basic CRUD based, but follows best practices. We created Docker containers for the API, database and UI, and hosted on local Docker instance.
Now we will deploy our app, all 3 containers, on a VPS and setup website domain to use with it. We will create a brand new VM on Azure, as I have got $200 free credit, you can also signup and get started for free too. Lets begin.
Complete code for the whole series is at https://github.com/saqibrazzaq/efcorebeginner.
Create Ubuntu Server based VM on Azure or any VPS
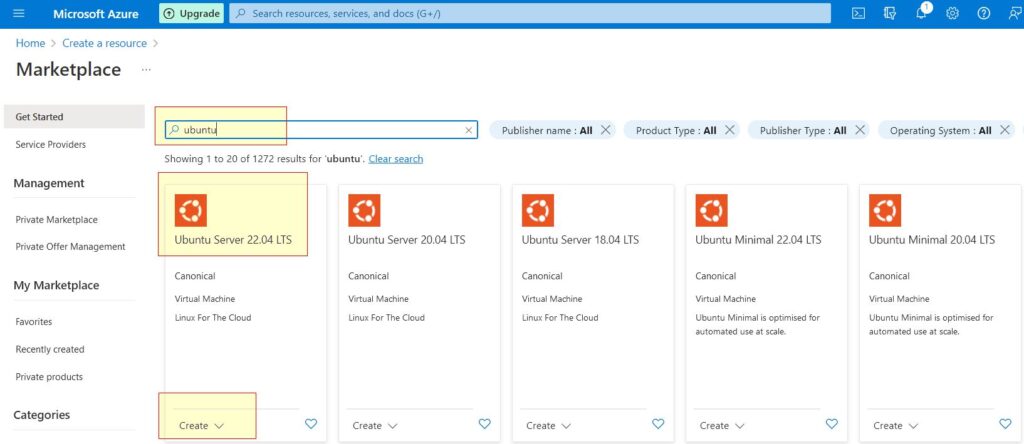
To host our app, we need a VPS where we can install Docker. For this tutorial, I will be using Microsoft Azure with a new account, as there is $200 credit in it, which can be utilized in the VM. I will create a new VM and install Ubuntu Server on it. You can create a new VM on your own hosting provider or any hosting provider that offers VPS. If you want to get free VM for trial on Microsoft Azure, create a new account at https://portal.azure.com. After login, create a new Resource, in search type ubuntu, choose Ubuntu Server 22.04 LTS and Create it.
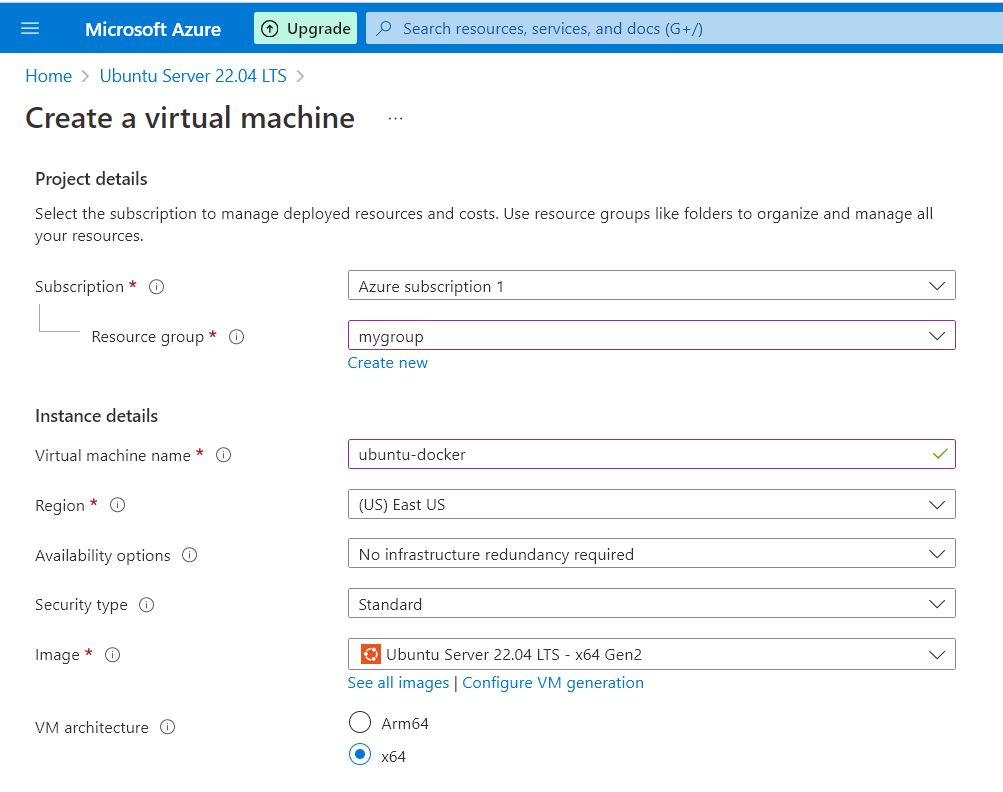
It will open Create a Virtual Machine page. Choose your subscription (free tier for new account), choose group (create new if first time). In name write ubuntu-docker. Image selected would be Ubuntu Server 22.04 LTS – x64 Gen2. Keep the architecture x64 which is default.
Next we choose the size of the VM, which consists of cpu and memory. We need at least 2 GB memory which is a requirement for SQL Server. Currently the minimal specs with 2 GB memory VM is Standard_B1ms with 1 vcpu and 2 GB memory. It costs $15.11 per month, we got $200 free for new account, so we can keep using this VM for free for even whole year!!.

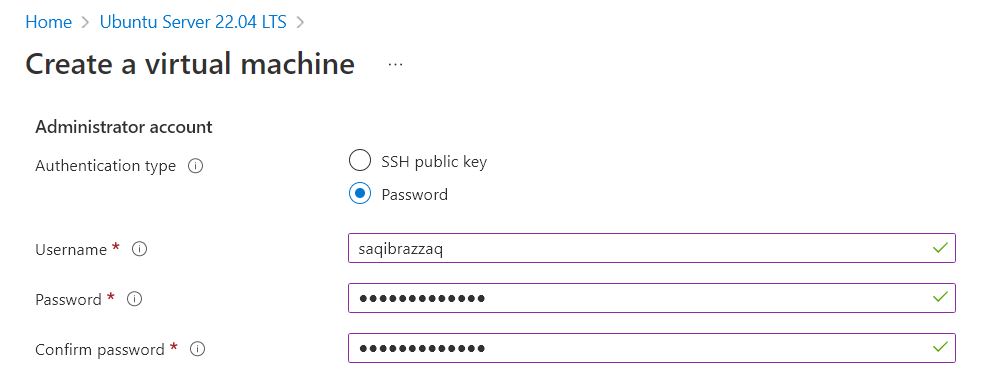
Next we create Administrator user account on this VM. We will choose Password authentication for this tutorial. You can choose SSH too, if you want more security. We will login via ssh on this VM with the username and password provided here.
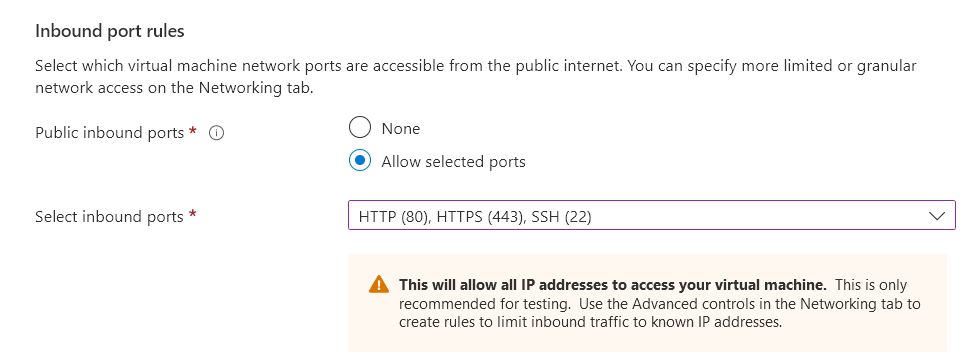
After that select inbound ports 22, 80 and 443. We need all these ports open publicly as 22 is required for ssh login and 80/443 are required for web apps.
Now Review and Create this VM. It will be ready in a minute. When ready, click on Go to Resource button to open properties of this VM. Azure provide a lot of options for the VM like Monitoring, restart, stop, delete, CLI login, view properties like public IP address, cpu, plan, subscription etc. We are only interested in the public IP Azure assigned to our VM. After getting the public IP, we will do the rest via ssh login.

Create subdomain and point it to the Ubuntu VM
We have created new VM in the previous step and got the public IP associated with this VM. Azure automatically creates a new public static IP address and binds to the newly created VM. Other VPS hosting providers, free or paid, also have similar process to automatically or manually assign a static IP address to the VM. At this stage, you must have a VM created with a public static IP address.
Note: You can skip this step, if your domain and VPS (VM) exists on the same service provider.
Now we will create a new subdomain and point it to the IP address of our VM. This can be done in two steps.
- Create new subdomain on domain registrar website
- Open DNS settings, use the VM’s IP address in A record
This is also very common and easy these days. I bought my domain from ionos.com, so I will use ionos.com website to create a new subdomain and update the DNS settings. You can do the same with your domain provider.
We will need two subdomains, one for the web API and other for React web app. Below are the subdomains that I am going to create. You can choose subdomains on your own domain name.
- person-web.efcorebeginner.com – for React web app having UI
- person-api.efcorebeginner.com – for ASP.NET web API
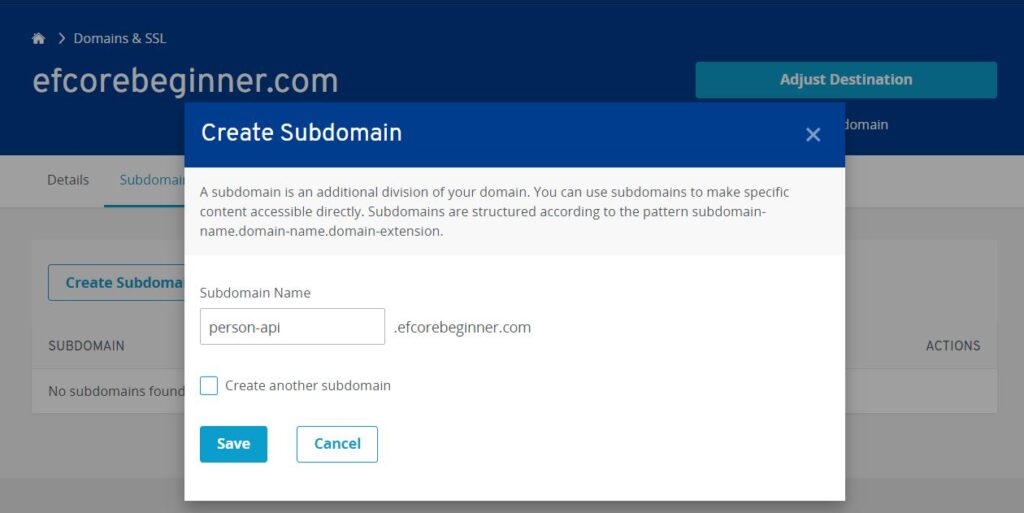
It is very easy to create in ionos.com, I go to my domain, choose subdomain option, choose create new. It just asks for the subdomain name. I created two subdomains using the simple process. After creating both subdomains, I choose the DNS tab on the main website page, it shows all DNS settings for all my subdomains.

Scroll down to see the A records of the new subdomains. When we create a new subdomain, its A record is set to the IP address of the main domain. My new subdomains are using the IP address of the main domain efcorebeginner.com.

Now edit the A record of person-api subdomain. Update the IP address and use the static IP of the Azure Ubuntu VM.
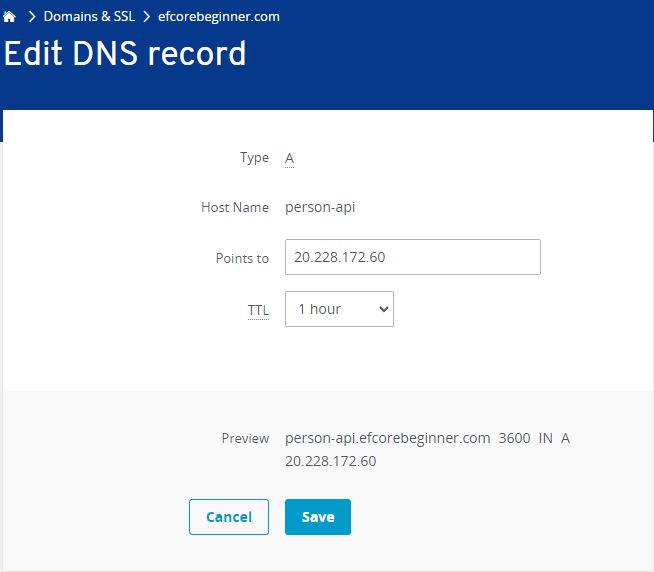
Repeat the same process with person-web subdomain. Edit A record of person-web subdomain and assign the new IP address of the Azure Ubuntu VM. Save the changes.
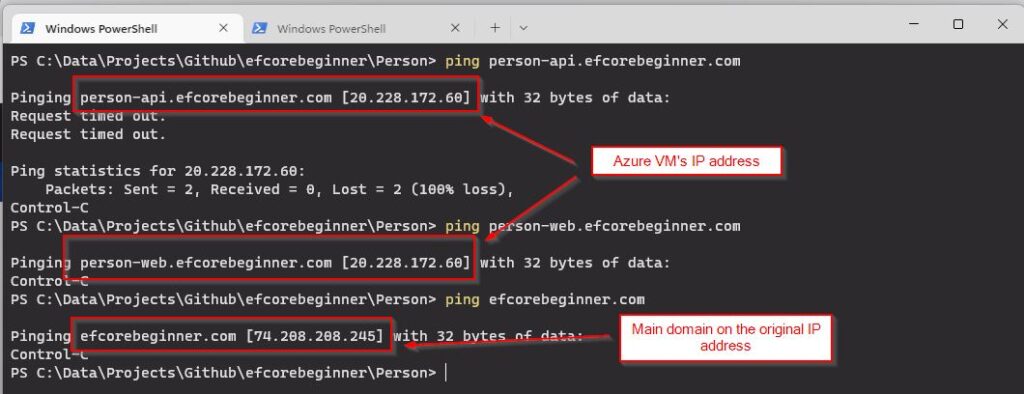
The DNS changes can take upto 24 hours to propagate. But it might take few minutes or few seconds if you are lucky. Keep trying the ping command as follows to verify this DNS update. Use your own domain for the ping command.
ping person-api.efcorebeginner.com
ping person-web.efcorebeginner.com
ping efcorebeginner.com
When the ping command shows the new IP address for the new subdomains, then we can proceed to the next step. In the screenshot below you can see that both the subdomains use the new Azure VM’s IP address. The A record of the main domain was not modified, so original domain will point to the original IP address.
This way the main domain and other subdomains will not be disturbed. We only update DNS settings of the new subdomains for our app.
SSH login on the Ubuntu Server VM and install Docker
We have setup subdomain and created new VM. Now we are ready to install Docker on the new VM. Open Terminal and do ssh login with the following command.
ssh saqibrazzaq@person-api.efcorebeginner.com
saqibrazzaq is the username that was specified in the Create new VM process on Azure website. person-api.efcorebeginner is the host where we want to login.
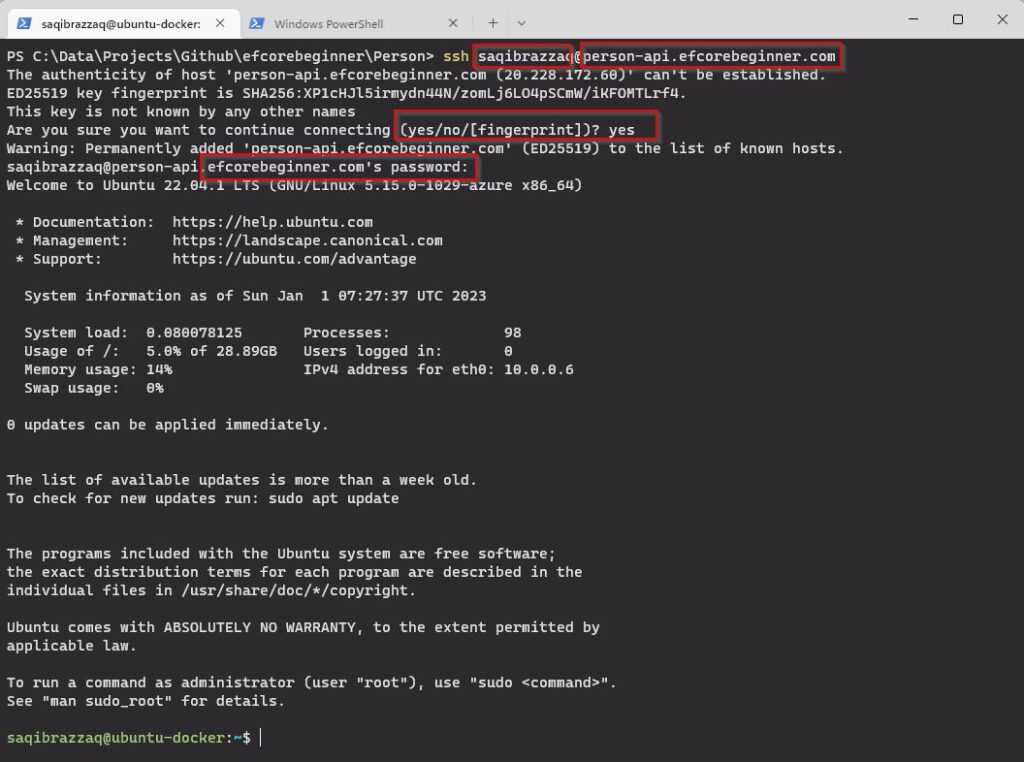
We can also do ssh user@ip.address. But IP addresses are hard to remember. So we use user@subdomain.com. Since our subdomain’s A record now uses the Ubuntu VM’s IP address, so ssh will open terminal to our new VM. For the first time, it will ask for confirmation to connect, type yes. It will ask for password, type your password that you gave when this VM was created on Azure. If everything is working fine, it will open the terminal of the Ubuntu server VM.
Update Ubuntu Server VM
First update the VM with the following commands. It will receive the updates if needed.
sudo apt update
sudo apt upgrade
Install Docker Engine
After updating the VM, lets install Docker on it. For Docker installation please use the original guide on https://docs.docker.com/engine/install/ubuntu/. I will use Install using the Repository method to install Docker engine.
sudo apt-get update
sudo apt-get install \
    ca-certificates \
    curl \
    gnupg \
    lsb-release
sudo mkdir -p /etc/apt/keyrings
curl -fsSL https://download.docker.com/linux/ubuntu/gpg | sudo gpg --dearmor -o /etc/apt/keyrings/docker.gpg
echo \
  "deb [arch=$(dpkg --print-architecture) signed-by=/etc/apt/keyrings/docker.gpg] https://download.docker.com/linux/ubuntu \
  $(lsb_release -cs) stable" | sudo tee /etc/apt/sources.list.d/docker.list > /dev/null
sudo apt-get update
sudo apt-get install docker-ce docker-ce-cli containerd.io docker-compose-plugin
The above commands are copied from the original guide at https://docs.docker.com/engine/install/ubuntu/. In January 2023 the above commands install the latest version of Docker engine on Ubuntu 22.04 LTS. These commands may change, so always refer to the original guide for Docker installation.
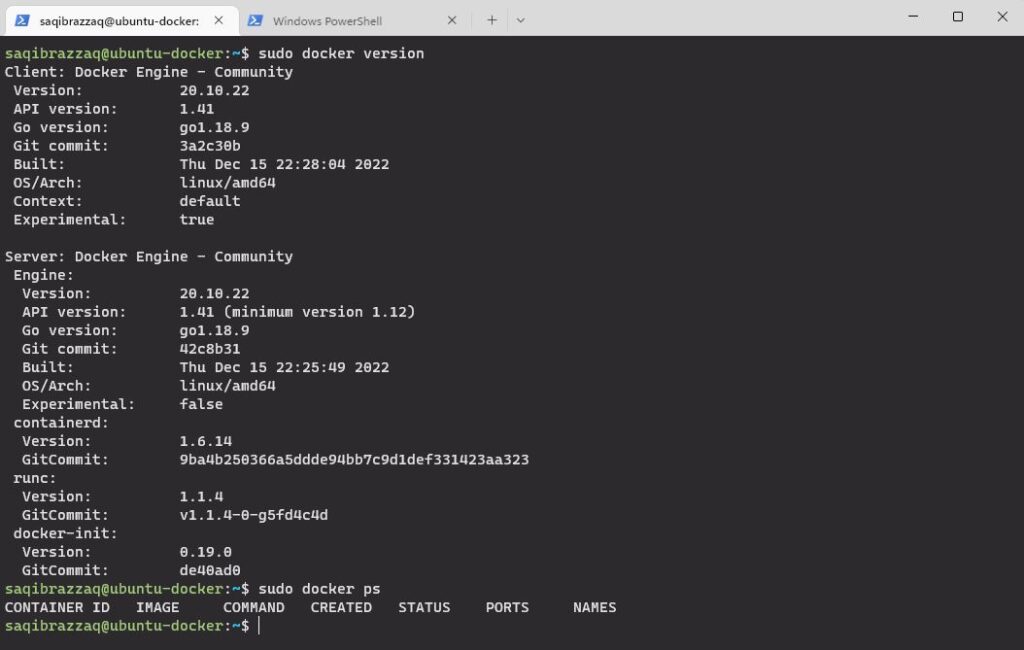
To verify that Docker engine is installed successfully, run the following commands.
sudo docker version
sudo docker ps
The docker version command will show the version of Docker engine installed. And docker ps command will show the running containers. Since it is new installation, we don’t have any containers running.
Add Nginx reverse proxy and Letsencrypt companion containers to Docker
What is Nginx? Nginx is a high performance web server that needs no introduction. We will use Nginx for receiving all requests on our web app and API.
What is Nginx Reverse proxy? We have total three containers, API, web app and database. These three containers will run on the same VM. Database container is internal, it is only accessible within Docker/VM. But two containers API and web app will be publicly accessible with subdomains person-api.domain.com and person-web.domain.com.
In simple words, we can run multiple websites on same port 80/443 on a single IP address, with using Nginx reverse proxy. It is available on Docker hub at https://hub.docker.com/r/jwilder/nginx-proxy.
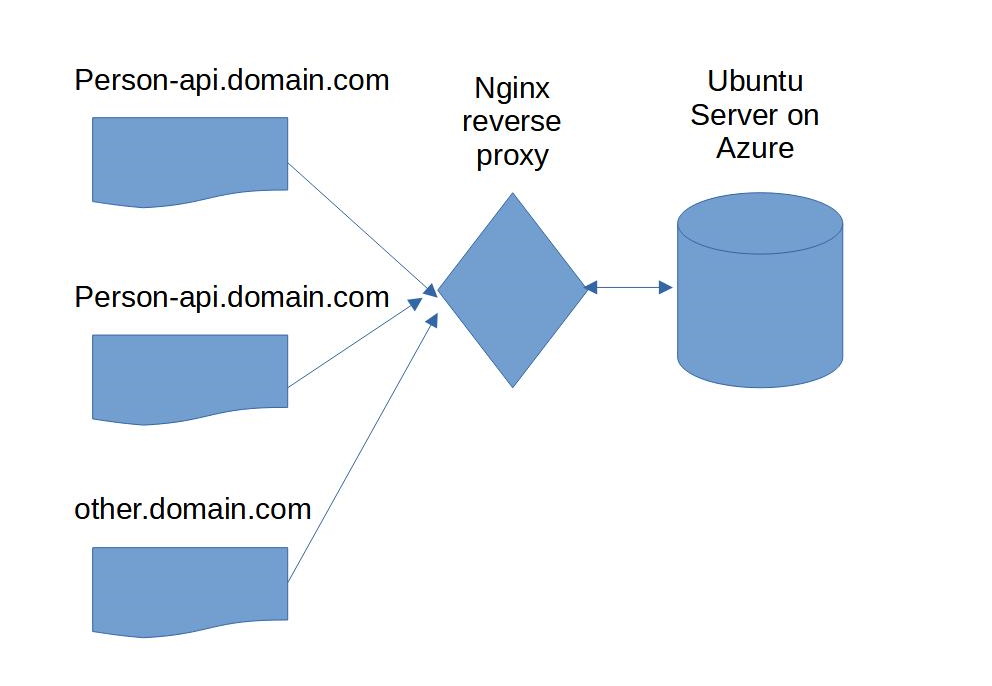
With reverse proxy, we can route requests for person-web.domain.com to container, on default port 80 or https/443. At the same time we can also route requests for person-api.domain.com to another container, on the same port 80/443. In fact, with reverse proxy, we can have n number of domains hosted on the same VM. We can access all domains using port 80/443 on the same VM.
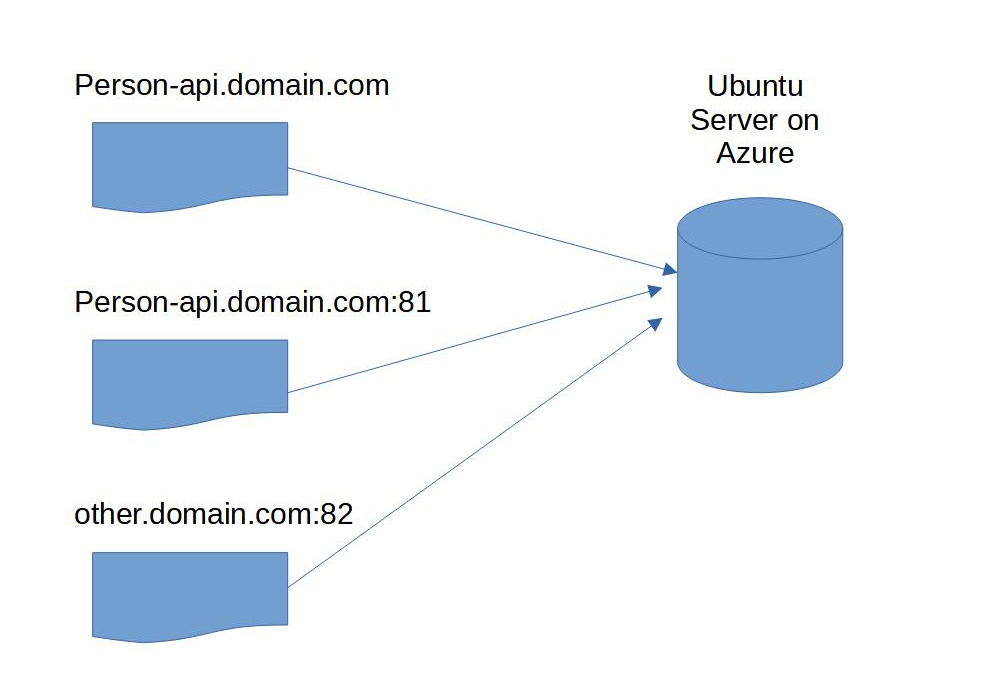
Without reverse proxy, we can use only one port for one service. For example port 80 for person-web.domain.com, port 81 for person-api.domain.com, port 82 for another service and so on. That is how we did in our local Docker instance. We did not have any reverse proxy, so we were using localhost:8001 for API and localhost:8003 for React web app.
What is LetsEncrypt? LetsEncrypt is SSL certificate generation authority. It is FREE. It is open source. It supports automation. We have two public subdomains and we will use two SSL certificates for each subdomain from LetsEncrypt.
What is LetsEncrypt Nginx Reverse Proxy Companion? It is automated tool to generate SSL certificates. It is available on Docker hub at https://hub.docker.com/r/nginxproxy/acme-companion. It works with Nginx reverse proxy as companion. Whenever we add a new container to Docker, it automatically generates SSL certificates. It is automated tool, which also renews SSL certificates automatically.
We will do all this with one docker compose file. Open web API project Visual Studio. Add a new folder in docker-compose project named install-docker. Create a new file nginx-proxy-ssl.yml in this folder. Its contents are below.
version: '3'

services:

  nginx-proxy:
    image: jwilder/nginx-proxy
    container_name: nginx-proxy
    ports:
      - "80:80"
      - "443:443"
    volumes:
      - conf:/etc/nginx/conf.d
      - vhost:/etc/nginx/vhost.d
      - html:/usr/share/nginx/html
      - dhparam:/etc/nginx/dhparam
      - certs:/etc/nginx/certs:ro
      - /var/run/docker.sock:/tmp/docker.sock:ro
    labels:
      - "com.github.jrcs.letsencrypt_nginx_proxy_companion.nginx_proxy"
    restart: always
    networks:
      - nginx-proxy

  letsencrypt:
    image: nginxproxy/acme-companion
    container_name: acme-companion
    depends_on:
      - nginx-proxy
    volumes:
      - vhost:/etc/nginx/vhost.d
      - html:/usr/share/nginx/html
      - dhparam:/etc/nginx/dhparam:ro
      - certs:/etc/nginx/certs
      - acme:/etc/acme.sh
      - /var/run/docker.sock:/var/run/docker.sock:ro
    restart: always
    networks:
      - nginx-proxy

volumes:
  conf:
  vhost:
  html:
  dhparam:
  certs:
  acme:

networks:
  nginx-proxy:
    external: true
We added this docker compose to GitHub repository, because it is easy to update code using Visual Studio. It is also easy to download this single file on Ubuntu using wget command.
Login to the Azure Ubuntu VM with ssh. We will create a new folder and run the installation commands in this folder.
mkdir install-person
cd install-person
Now we need the nginx-proxy-ssl.yml file that we created above. You can download from GitHub repository using raw link as follows
wget https://raw.githubusercontent.com/saqibrazzaq/efcorebeginner/main/Person/install-docker/nginx-proxy-ssl.yml
ls
Use the ls command to verify that file is downloaded. If you are following this tutorial series and creating project on GitHub, you can use raw link of this yml file from your own repository. But this file is generic, my link will also work on any VM.
The yml file depends on an external network named nginx-proxy. We need to create it before we install any container. Create the network with the following command.
sudo docker network create nginx-proxy
sudo docker network ls
Use the docker network ls command to verify that the network is created.

Now its time to create the Nginx reverse proxy and LetsEncrypt companion. Run the following command
sudo docker compose -f nginx-proxy-ssl.yml up -d
Below is brief explanation of this command.
docker compose command downloads and installs multiple containers from yml file. -f filename.yml means load custom file. Without -f, it will load docker-compose.yml by default. up -d means download, create and run the containers, in detach mode.
It will take some time depending on the network speed on the VPS. After the command finishes execution, verify the images are in running state with the docker ps command as follows.
sudo docker ps

The Nginx reverse proxy with companion are installed and running, now will continue with our containers.
Publish our containers on Docker hub
We will now publish our API and React app containers on Docker hub. In our website/VM, we will directly download the published containers from hub.docker.com.
At localhost, local Docker instance, we created the containers from the source code. That is perfectly fine for development environment.
To deploy the app on live server, we will not copy the source code to live server, build and deploy on server. Instead, we will create production build, publish it on Docker hub. This way we will install our app on server by just using a simple docker-compose.yml. Just like we only use a single nginx-proxy-ssl.yml file for Nginx proxy and companion installation, our app installation will be from a simple docker compose yml file.
Before publishing on Docker hub, we have to update few configurations.
Update CORS in web API
Open web API project in Visual Studio. In Person project, open Extensions\ServiceExtensions.cs file. See the ConfigureCors method. It allows the following hosts
- http://localhost:3000 – React app URL, when we run using npm start
- http://localhost:8003 – React app URL when we run from local Docker instance
- https://person-web.efcorebeginner.com – Add this, so that React app at this URL can also call the ASP.NET web API
Update the ConfigureCors method as follows. You should add the URL of your subdomain here.
public static void ConfigureCors(this IServiceCollection services)
{
  services.AddCors(options =>
  {
    options.AddPolicy("CorsPolicy", builder =>
    {
      builder
      //.AllowAnyOrigin()
      .WithOrigins(
          "http://localhost:3000",
          "http://localhost:8003",
          "https://person-web.efcorebeginner.com")
      .AllowCredentials()
      .AllowAnyMethod()
      .AllowAnyHeader();
    });
  });
}
Update API Base URL in React .env.production file
Now open React app source in Visual Studio Code. Open .env.production file in root. It has base url environment variable that we use on localhost. Now we will build for live deployment, so update it with live URL. Update the .env.production file as follows. Here you should use your own subdomain that you created for the web API.
REACT_APP_API_BASE_URL=https://person-api.efcorebeginner.com/api
Build Docker images
The source code is ready now for production build. Open the terminal at project root path where .sln file exists. Run the following command to build the images.
docker compose build
Docker login
This will build the images from source code again, with the updated values in CORS and .env files. After the build is complete, run the docker login command.
docker login
It will ask for your credentials at hub.docker.com. You can create your account for free. Provide your username and password.

Push images to docker hub
Now run the docker compose push command, which will upload the web API and React app containers to hub.docker.com.
docker compose push
To verify that your images are pushed successfully, login on hub.docker.com and click on your Repositories. The two repositories should be listed there.

The above repositories are listed under my login and my user account. You should be able to see your own repositories when you login.
In the next step, we will create a new docker compose file to install from docker hub.
Create docker compose file for installation from Docker hub
Open web API project in Visual Studio. The docker-compose project contains the default docker-compose.yml file. We updated this file to create, build and run containers on local Docker instance. We also used the same file to build to production at hub.docker.com.
We created install-docker folder and created nginx-proxy-ssl.yml to create Nginx proxy and LetsEncrypt companion containers on live server. Now we will create another docker compose file which will create containers of our app from docker hub.
Create a new file in docker-compose project, install-docker folder, name it as person-app.yml.
version: '3.4'

services:
  api:
    image: saqibrazzaq/person_api
    container_name: person_api
    depends_on:
      - db
    environment:
      VIRTUAL_HOST: person-api.efcorebeginner.com
      LETSENCRYPT_HOST: person-api.efcorebeginner.com
      LETSENCRYPT_EMAIL: "saqibrazzaq@gmail.com"
      #- SQLSERVER= provide sqlserver connection string here OR load from api.env
    expose:
      - 80
    networks:
      - nginx-proxy
      - person_db
    restart: always

  db:
    image: mcr.microsoft.com/mssql/server:2017-latest
    container_name: person_db
    volumes:
      - db_data:/var/opt/mssql/data
    environment:
      ACCEPT_EULA: "Y"
      MSSQL_PID: "Express"
      #MSSQL_SA_PASSWORD: provide password here OR load from db.env
    ports:
      - "1433"
    networks:
      - person_db
    restart: always

  web:
    image: saqibrazzaq/person_web
    container_name: person_web
    environment:
      VIRTUAL_HOST: person-web.efcorebeginner.com
      LETSENCRYPT_HOST: person-web.efcorebeginner.com
      LETSENCRYPT_EMAIL: "saqibrazzaq@gmail.com"
      CHOKIDAR_USEPOLLING: "true"
    expose:
      - 80
    depends_on:
      - api
    networks:
      - nginx-proxy
    volumes:
      - /app/node_modules
      - ./person_web:/app
    restart: always

volumes:
  db_data:

networks:
  nginx-proxy:
    external: true
  person_db:
    internal: true
This docker file does not contain build instructions. It contains image download and deployment instructions. It has 3 sections for 3 services. Lets go through the sections one by one.
api service
- image: saqibrazzaq/person_api – Now this is our image identifier on hub.docker.com.
- container_name: person_api – This is the name api container will have on Docker instance of Azure Ubuntu server VM
- environment variables:
- VIRTUAL_HOST: person-api.efcorebeginner.com – Required by Nginx reverse proxy container
- LETSENCRYPT_HOST: person-api.efcorebeginner.com – Required by LetsEncrypt acme companion container
- LETSENCRYPT_EMAIL: “saqibrazzaq@gmail.com” – Also required by LetsEncrypt companion
- SQLSERVER: server=person_db;database=Person;User id=sa;Password=Pa$$word111;MultipleActiveResultSets=true;TrustServerCertificate=True;
- expose: 80 – Required by Nginx reverse proxy. Port 80 of person-api.domain.com will be mapped with port 80 of this container
- networks: – nginx-proxy – person_db
Note that in SQLSERVER=connection string, we used server=person_db. person_db is the container_name of the db service.
This api service use two networks. nginx-proxy is the external network, means API service will be visible to external users. person_db is internal network.
db service
- image: mcr.microsoft.com/mssql/server:2017-latest – Microsoft SQL Server image
- container_name: person_db – name used in Docker instance at Azure Ubuntu Server VM
- environment:
- ACCEPT_EULA: “Y”
- MSSQL_PID: “Express”
- MSSQL_SA_PASSWORD: Pa$$word111
- networks: – person_db
The db service does not contain expose section, because we will keep it internal.
It uses person_db network, which is internal. person_db network is used by two services, api and db, which means these two services can connect with each other.
web service
- image: saqibrazzaq/person_web – This is our own image hosted on hub.docker.com
- container_name: person_web – This name will be used on Docker instance where it will be installed
- environment:
- VIRTUAL_HOST: person-web.efcorebeginner.com – Used by Nginx reverse proxy container
- LETSENCRYPT_HOST: person-web.efcorebeginner.com – used by LetsEncrypt acme companion
- LETSENCRYPT_EMAIL: “saqibrazzaq@gmail.com” – also used by LetsEncrypt acme companion for certificate issue
- expose: 80 – Nginx reverse proxy will map port 80 of this port with port 80 of the VM
- networks: nginx-proxy
The web service uses the external network nginx-proxy, which means this service will be available to public. This service does not use person_db network, so it cannot connect with db.
Save this person-app.yml file. Commit it to GitHub or your developer repository. Now we will use this file on Azure Ubuntu server VM.
Install Docker containers from Docker hub
Open terminal and login to the VPS with ssh command. On the Azure Ubuntu Server we created the install-person folder, change directory to that folder.
ssh saqibrazzaq@person-api.efcorebeginner.com
cd install-person
Download the docker install file in this folder using wget raw link
wget https://raw.githubusercontent.com/saqibrazzaq/efcorebeginner/main/Person/install-docker/person-app.yml
Before we run this Docker compose file, we need to create the external network as follows.
sudo docker network create nginx-proxy
sudo docker network ls
Verify with docker network ls command and check that nginx-proxy network exists.
We also need to update the database connection string and SQL Server password in the docker install file. Run the following command to edit file on server.
nano person-app.yml
In api section, provide connectionstring of SQL Server e.g. SQLSERVER: server=person_db;database=Person;User id=sa;Password=Pa$$word111;MultipleActiveResultSets=true;TrustServerCertificate=True;
In db section, provide the password of SQL Server e.g. MSSQL_SA_PASSWORD: Pa$$word111
Press Ctrl + O to save the file, then Ctrl + X to exit from nano editor.
After saving the file, enter the following command to download and install the containers from Docker hub.
sudo docker compose -f person-app.yml up -d
For the first time it will download the images from Docker hub to the Ubuntu Server on VPS and start the containers. If everything went well, you should be able to open the web API and React app in browser. It might take a minute for LetsEncrypt acme companion to request for the SSL certificates for both API and web app. If you get SSL error, try refreshing again after a minute. Below screenshot shows the API URL https://person-api.efcorebeginner.com/api/persons. You can replace it with your own subdomain.

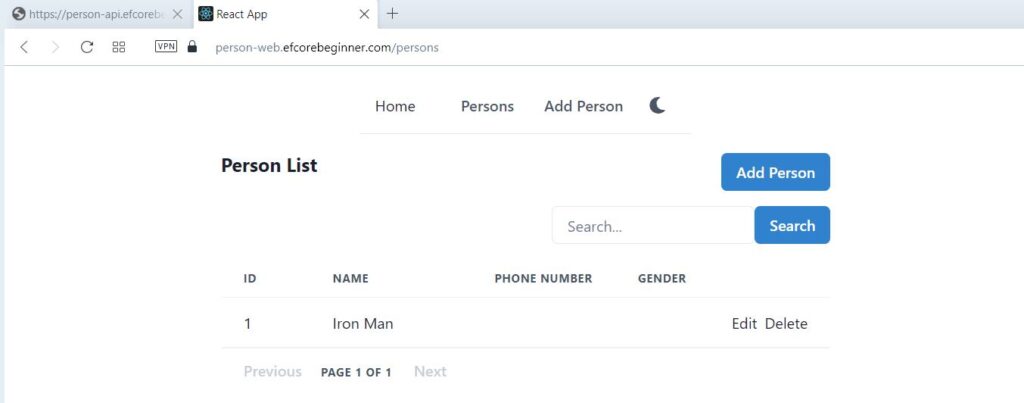
Also open the React app at URL https://person-web.efcorebeginner.com/persons. If the process went smoothly, the app should work as shown in the screenshot below.
Update process on live website
If you receive any error or update anything in source, follow the process below to update the container on live website.
In local system, run web API project from Visual Studio debug/run on localhost. Run the React app using npm start.
If you want to update on live website, then first build the Docker images, then upload the images on Docker hub.
Rebuild Docker images and update Docker hub
Open terminal and change directory to the folder where .sln and docker-compose.yml exists. Run the following commands.
docker compose build
docker login
docker compose push
This way your images at hub.docker.com will be updated with the latest updates in source code.
Download latest images on live website and Rerun the containers
Once the images on Docker hub are updated, you can now get the latest version on the live server.
Open the terminal on Azure Ubuntu Server using ssh
ssh saqibrazzaq@person-api.efcorebeginner.com
Change directory to the install-person folder, where our person-app.yml file exists. Download the latest images from docker hub. Stop and remove existing containers. Start the containers again, now latest version will be used.
cd install-person
sudo docker compose -f person-app.yml stop
sudo docker compose -f person-app.yml rm
sudo docker compose -f person-app.yml pull
sudo docker compose -f person-app.yml up -d
We are stopping existing containers using stop and rm. Then using pull command to get the latest images from docker hub. Then again using up -d command to run the containers. This way we can update the live website with the latest version.