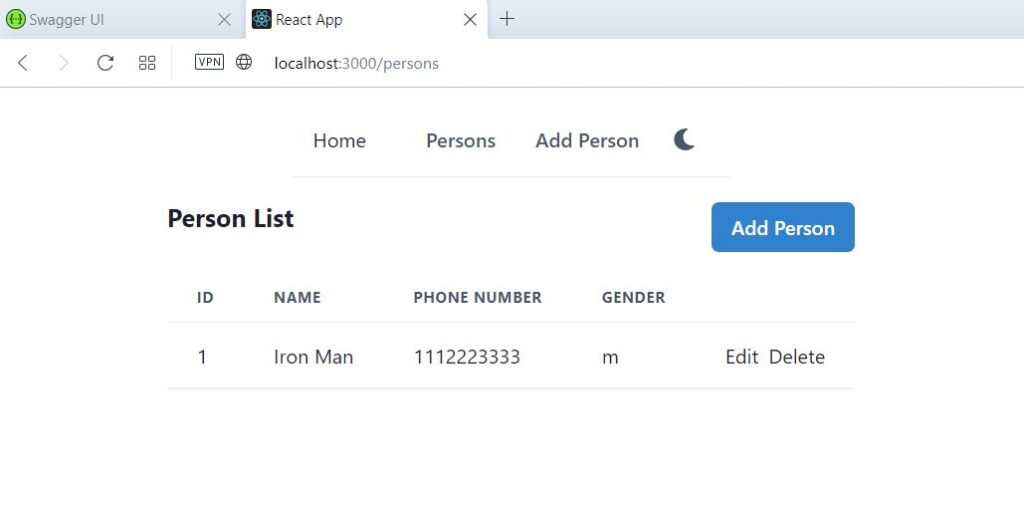
This is the 5th tutorial in React client app series that work with Persons web API. In last tutorial we created a new component in React and called web API to get all persons. We also created DTO for Person response to get strongly typed object. But we just called the API and displayed the response in Console window. In this article we will see how we can display the list data in a table.

useEffect hook to load Person List from the web API
Previously we just called PersonApi.getAll method and displayed the response in Console window. But now we will properly get the data from the API with the useEffect hook. We will store the data in state variable. Update your code as follows.
const [persons, setPersons] = useState<PersonRes[]>();

useEffect(() => {
  loadAllPersons();
}, []);

const loadAllPersons = () => {
  PersonApi.getAll().then((res) => {
    setPersons(res);
  });
};
The state variable is of type PersonRes[]. PersonRes is the Dto, which contains id, name, phone as members. useEffect hook will call API and set this state variable with person list. Our Dto structure matches the Json data which we get from the API.
Page Layout
lets set the page layout first. Update the return method of Persons as below.
return (
  <Box width={"100%"} p={4}>
    <Stack spacing={4} as={Container} maxW={"3xl"}>
      {showHeading()}
      {showPersons()}
    </Stack>
  </Box>
);
It renders a box of width 100%. Inside the box, there is Stack, which has some spacing. Inside stack, we are calling two methods. One for displaying page heading and other for displaying the table. You will get errors in showHeading and showPersons. First add the showHeading method as follows
const showHeading = () => (
  <Flex>
    <Box>
      <Heading fontSize={"xl"}>Person List</Heading>
    </Box>
    <Spacer />
    <Box>
      <Link ml={2} as={RouteLink} to={"/persons/edit"}>
        <Button colorScheme={"blue"}>Add Person</Button>
      </Link>
    </Box>
  </Flex>
)
This is based on Chakra UI components. We Flex to render components with dynamic width. It works as below
- Left box displays the text heading
- Right box displays the link button
- Spacer in the center take the remaining space, whatever is left
This is a way to left align and right align the components using Flex and Box.
The second method showPersons will display a Table, containing list of Persons. We will display person list in Table component. It has 4 headers, Id, Name, Phone number and Gender. We call map on persons state variable array to create the rows dynamically. See the code snippet below.
const showPersons = () => (
  <TableContainer>
    <Table variant="simple">
      <Thead>
        <Tr>
          <Th>Id</Th>
          <Th>Name</Th>
          <Th>Phone Number</Th>
          <Th>Gender</Th>
          <Th></Th>
        </Tr>
      </Thead>
      <Tbody>
        {persons?.map((item) => (
          <Tr key={item.personId}>
            <Td>{item.personId}</Td>
            <Td>{item.firstName} {item.lastName}</Td>
            <Td>{item.phoneNumber}</Td>
            <Td>{item.gender}</Td>
            <Td>
              <Link
                mr={2}
                as={RouteLink}
                to={"/persons/edit/" + item.personId}
              >
                Edit
              </Link>
              <Link as={RouteLink} to={"/persons/delete/" + item.personId}>
                Delete
              </Link>
            </Td>
          </Tr>
        ))}
      </Tbody>
    </Table>
  </TableContainer>
)
he last column displays Edit and Delete links. We will create these pages later.
Note the component, it is from Chakra UI. It renders as RouteLink, which is react-router-dom 6’s Link. In to property, we generate the urls for edit and delete pages. Since this website is all about creating projects with best practices, we will not go in details of each component. You can read the React, Chakra UI and React Router documentation for more details.
The complete code snippet for Persons.tsx is below.
import { Box, Button, Container, Flex, Heading, Link, Spacer, Stack, Table, TableContainer, Tbody, Td, Th, Thead, Tr } from "@chakra-ui/react";
import { useState, useEffect } from "react";
import { PersonApi } from "../api/personApi";
import { PersonRes } from "../dtos/Person";
import { Link as RouteLink, useParams } from "react-router-dom";

const Persons = () => {
  const [persons, setPersons] = useState<PersonRes[]>();

  useEffect(() => {
    loadAllPersons();
  }, []);

  const loadAllPersons = () => {
    PersonApi.getAll().then((res) => {
      setPersons(res);
    });
  };

  const showHeading = () => (
    <Flex>
      <Box>
        <Heading fontSize={"xl"}>Person List</Heading>
      </Box>
      <Spacer />
      <Box>
        <Link ml={2} as={RouteLink} to={"/persons/edit"}>
          <Button colorScheme={"blue"}>Add Person</Button>
        </Link>
      </Box>
    </Flex>
  )

  const showPersons = () => (
    <TableContainer>
      <Table variant="simple">
        <Thead>
          <Tr>
            <Th>Id</Th>
            <Th>Name</Th>
            <Th>Phone Number</Th>
            <Th>Gender</Th>
            <Th></Th>
          </Tr>
        </Thead>
        <Tbody>
          {persons?.map((item) => (
            <Tr key={item.personId}>
              <Td>{item.personId}</Td>
              <Td>{item.firstName} {item.lastName}</Td>
              <Td>{item.phoneNumber}</Td>
              <Td>{item.gender}</Td>
              <Td>
                <Link
                  mr={2}
                  as={RouteLink}
                  to={"/persons/edit/" + item.personId}
                >
                  Edit
                </Link>
                <Link as={RouteLink} to={"/persons/delete/" + item.personId}>
                  Delete
                </Link>
              </Td>
            </Tr>
          ))}
        </Tbody>
      </Table>
    </TableContainer>
  )

  return (
    <Box width={"100%"} p={4}>
      <Stack spacing={4} as={Container} maxW={"3xl"}>
        {showHeading()}
        {showPersons()}
      </Stack>
    </Box>
  );
};

export default Persons;
Now run the app using npm start, click on Persons link from the top menu. The person list should be displayed in a table.
We have just one record in the Person table, so it is displayed here.
In the next article, you will learn how to build forms using formik, for create and edit operations.